Have you ever taken a picture and discovered that your subject appeared too orange or blue? Then you’ve encountered a situation where your camera’s white balance was set incorrectly for the scene.
Colour of light
All sources of light (“illuminants”) have colour. The colour of the light influences our perception of the colour of objects. Some illuminants, such as neon light tubes, emit light within a very narrow band of the visible spectrum. This type of coloured light is very saturated, and neutral-coloured objects illuminated by it will take on its hue.
When a source of light is considered “white” when it emits light continuously (although not necessarily evenly) across the visible spectrum. Although white light exists in various tints, its defining characteristic is that it provides a reasonable rendition of the colour of objects. For example, the sun appears white because it emits light almost evenly across the visible spectrum. Relative to sunlight, incandescent lightbulbs (those with tungsten filaments so hot that they glow) appear amber-yellow because they emit a more significant portion of their light in the orange-red rather than the violet-blue part of the visible spectrum. Under both types of white light, red-coloured objects will appear red, green-coloured objects will appear green, and so forth.
When transitioning between different sources of light, our eyes are remarkably adept at adjusting to variations in white light so that neutral-coloured objects, such as white sheets of paper, are perceived as white under both sunlight and lamplight. However, unlike our eyes, cameras see colour as absolute and cannot adapt to the prevailing tone of the light, and this can result in auto white balance errors.
Colour temperature
In photography, colour temperature describes the relative warm or cool appearance of white light. Cameras let you select a colour temperature in Kelvins. On many cameras, this scale ranges from about 2500 to 10,000 K, with the lower ranges representing orange-amber sources, such as incandescent bulbs, and the higher ranges representing bluish-white sources, such as light from the blue sky (“sky light”). Actual daylight, being direct overhead sunlight with a clear sky, is represented by approximately 5600 K. This closely corresponds to the output colour temperature of most electronic flashes and the ideal colour of light for most consumer photographic film.
Colour temperature and black body radiation
Why is the SI unit of temperature, the Kelvin, used to describe the warm or cool appearance of light in photography? Colour temperature is a number that represents the spectral distribution of light emitted by an idealized “black body” with that surface temperature. A black body is a solid object that is opaque and non-reflective. All solids above 0 K emit electromagnetic radiation. As the temperature of a solid object increases, so too does its radiative energy. This radiative energy crosses into the visible spectrum as a dim reddish glow when the temperature of the solid rises to about 798 K. Assuming its temperature could grow indefinitely, the visible light it emits would transition from reddish-orange to yellow to white and, finally, to bluish-white. Of course, most metals will melt before achieving a yellow-ish glow. Tungsten is an exception. The thin tungsten filaments used in regular incandescent lightbulbs reach temperatures (and colour temperatures) of approximately 2750 K and can go up to 3200 K in halogen enclosures.
We use the term correlated colour temperature to describe the apparent colour quality of white light that corresponds to the colour temperature of a black body source. For example, the commonly accepted correlated colour temperature of an overcast sky, which at 6500–8000 K is slightly cooler than daylight, is not indicative of its actual temperature. Similarly, modern LEDs, fluorescent tubes, and CFLs can evoke the apparent colour quality of warm incandescent or cool daylight sources of light without the corresponding temperatures.
Colour temperature in practice
When your camera’s colour temperature setting matches the colour temperature of the illuminant, your white balance is neutral. When your camera’s colour temperature is set higher than the colour temperature of the illuminant, your picture will appear warmer. When your camera’s colour temperature is set lower than the colour temperature of the illuminant, your photo will look more blue-ish.
For example, if your camera’s white balance is set to match daylight and you’re taking pictures illuminated predominantly by incandescent lighting, your photo will have a significant amber-orange colour cast. However, if your camera’s white balance is set to match incandescent light and you’re taking pictures under daylight conditions, your photo will have a significant blue colour cast.


Colour tint
Colour tint describes the presence of a green or magenta colour cast in white light. An illuminant can exhibit one or the other, but never both, as they cancel one another. Such colour casts are generally considered undesirable in photography. Portraits with a green colour cast give their subjects a sallow, unhealthy complexion, whereas magenta colour casts produce complexions that appear too ruddy and rubescent.
The presence of colour tint is often seen when taking photos under artificial illuminants that have discrete, non-continuous emissions across the visible spectrum of light. These include many consumer LEDs, fluorescent tubes and CFLs, street lamps, etc. Colour tint is rarely encountered when taking photos under natural sources of light (daylight, overcast, skylight), incandescent light, or xenon flash.

White balance
White balance (WB) is a computational process for removing colour casts from your images so that subjects that are colour-neutral in reality are rendered neutral in the resulting photograph. It’s accomplished by matching the interpretation of recorded colours to the colour of light produced by the illuminant. In digital photography, white balance is achieved entirely through software manipulation of the image. Adjusting the white balance setting doesn’t affect your exposure parameters or any other physical characteristic of the camera or lens.
When your camera’s white balance is set to match the distinctive colour of a given illuminant, your white balance is considered accurate. For example, if you’re taking a picture under midday sunlight and set your camera’s white balance to daylight, your white balance is correct because your camera’s interpretation of colours will match the principal light source; whites and greys, in reality, will appear white and grey in the resulting picture. However, if you set your camera’s white balance to daylight and you take a photo of a subject under incandescent light, your white balance setting would be incorrect because your camera’s interpretation of colours will not match the prevailing illuminant; whites and greys will appear amber in the resulting photograph.
Auto white balance
Auto white balance (AWB) is the default setting on new cameras and in the automatic shooting modes. When auto white balance is engaged, the camera reads the scene and attempts to determine the colour temperature and tint of the light based on factors such as programmed adjustments, the overall balance and distribution of hues and tones in the composition, and the presence of skin tones when aided by face detection (where available).
Auto white balance generally provides excellent results for scenes that contain a prominent neutral-coloured object, a suitable variety and distribution of colours, and when photographed under a single source of average outdoor light.
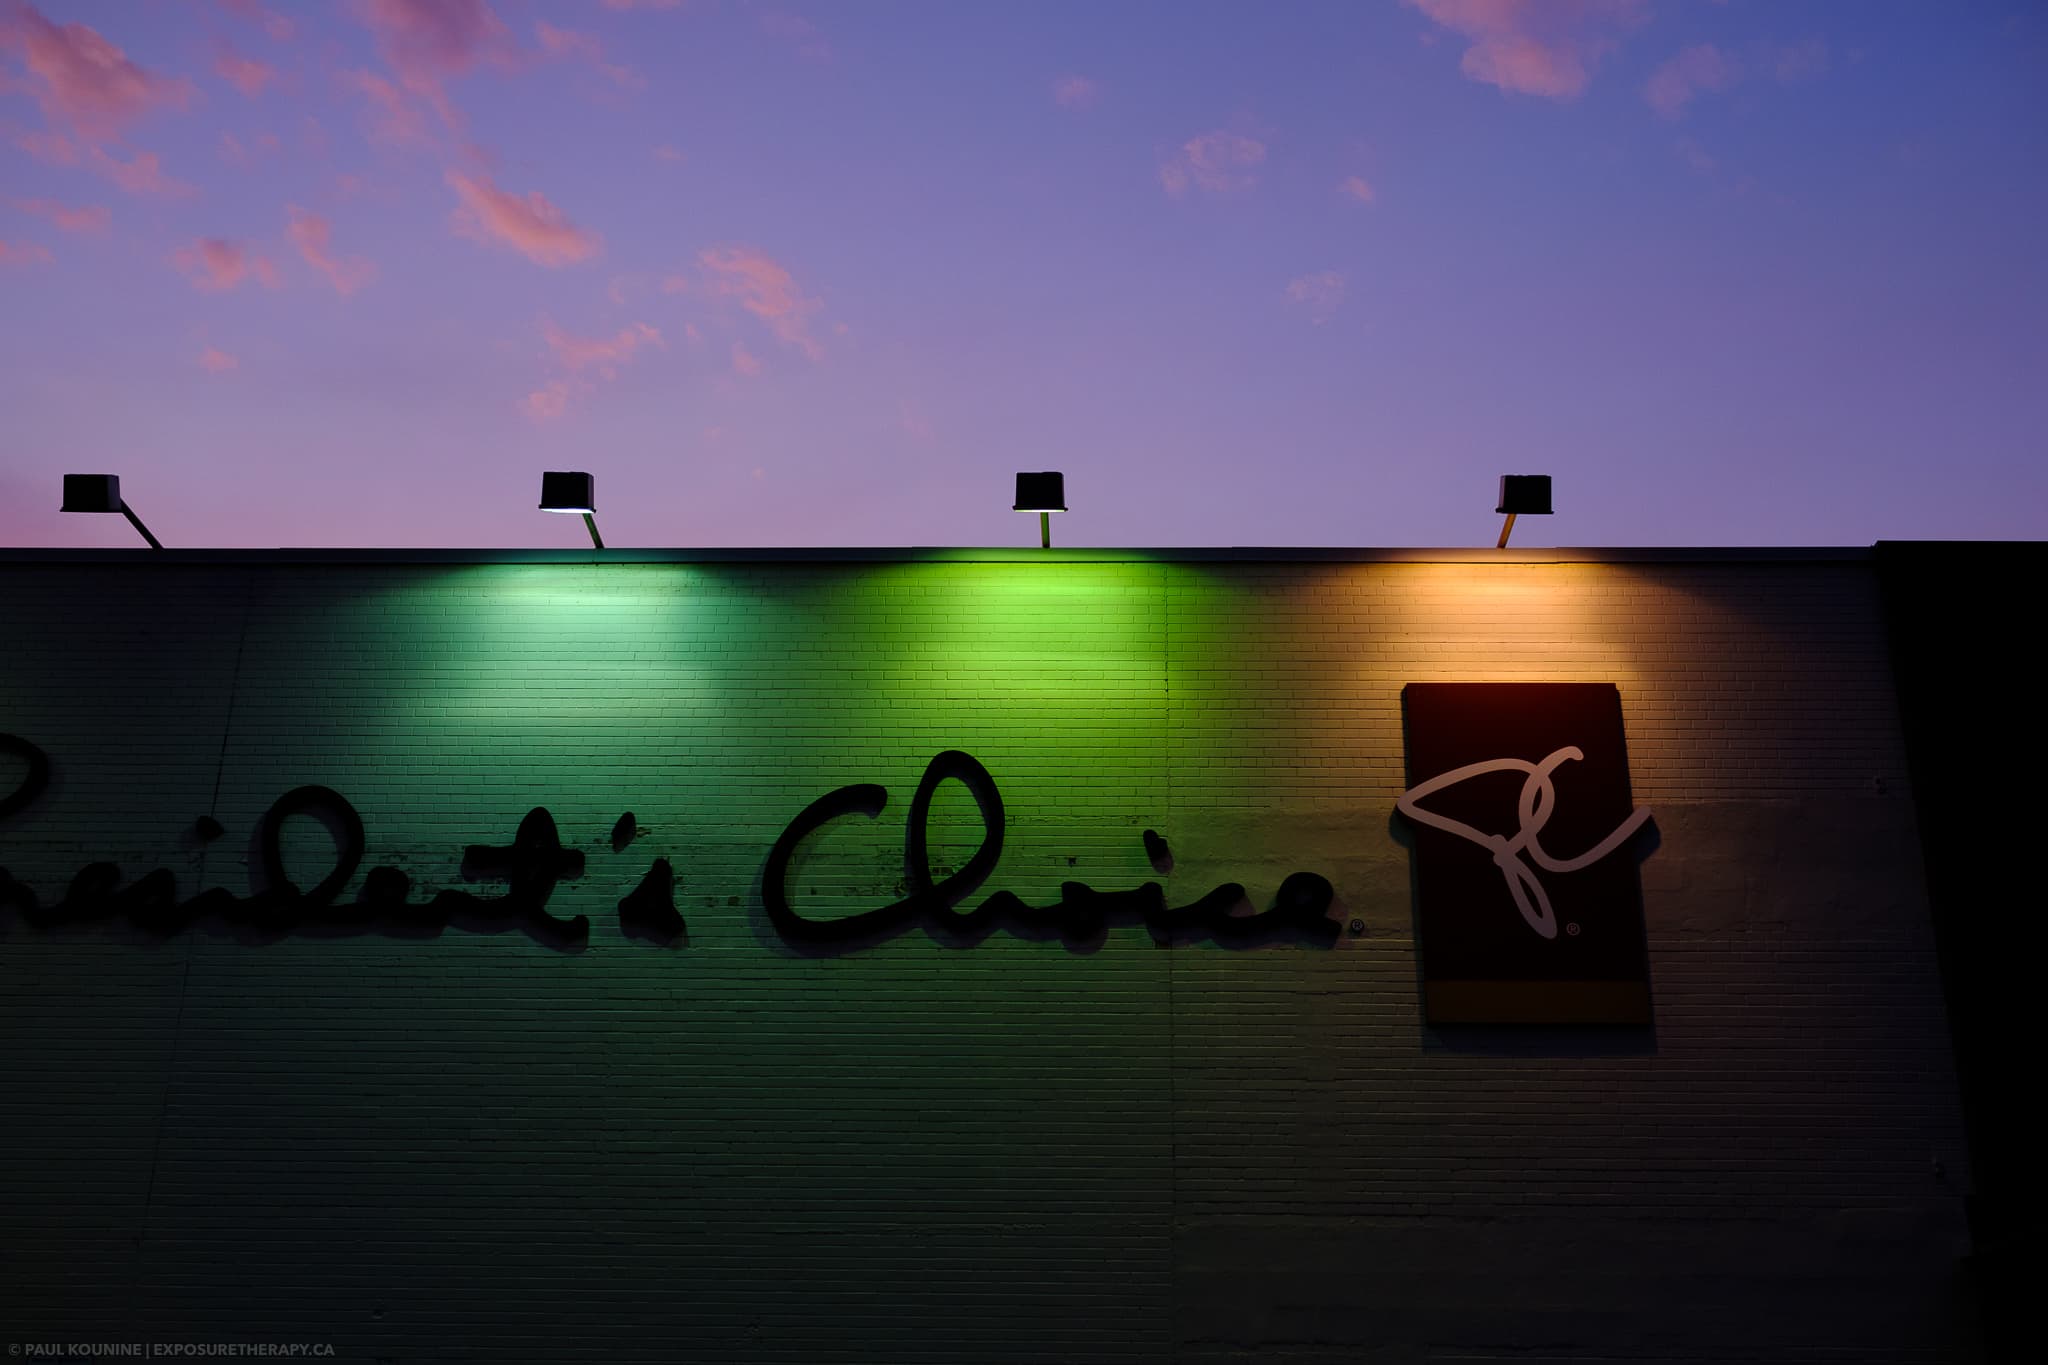
Auto white balance tends to err in scenes that lack a neutral-coloured reference object and have an overabundance of warm or cold tones or green or magenta hues in the subject matter. For example, when taking a full-body portrait against a background of lush green vegetation, the camera can mistake the presence of green-coloured objects for a profusion of green-tinted light. [Cameras cannot reason like people and don’t have a basic understanding of the scene and its subjects; they’re incapable of differentiating between green objects lit by daylight and grey objects illuminated by green light.]. It will attempt to fix this by bringing the average colour of the scene closer to neutral by adding magenta, which is complementary to green. This solution will desaturate the greens and add a magenta cast to the remaining colours.
White balance presets
Many cameras let you manually select from among several general white balance presets designed for situations where you anticipate that auto white balance will encounter problems, such as scenes dominated by monochromatic subjects. The following overview describes each preset and the general conditions for which they’re prescribed. Your camera will not necessarily have every preset.
Shade. This white balance preset is meant for use in the daytime in relatively cloudless to partly cloudy conditions when your subject is shaded from direct sunlight and illuminated almost exclusively by sky light. It balances the camera’s interpretation of colour for the significant presence of blue-ish white light.
Cloudy. This white balance preset is meant for use during daytime and under heavy cloud cover or overcast conditions. It can also be the right choice when the daylight setting produces cooler than expected results, such as at high elevations or in hazy conditions.
Daylight. This preset is intended to match the colour temperature of direct midday sunlight under a clear or partly cloudy sky. The precise colour temperature of this setting varies among cameras, falling into the range of 5000–5500 K. [The colour temperature of sunlight changes throughout the day and especially when the sun is near the horizon. Therefore, the daylight white balance preset will not give perfectly neutral results at all times. See What is a “correct” white balance?]
Flash. The xenon flashes found in most cameras and hot-shoe-mounted speedlights are designed to closely resemble the spectral quality and colour of direct sunlight, which is about 5600 K. This can vary by a few hundred kelvins between brands. When a flash is used to take a photo indoors at night with ambient incandescent lighting, your white balance should be set to flash. This will give you a neutral rendition of your primary subjects with an amber-coloured background.
Fluorescent. The fluorescent white balance preset is designed to minimize the green colour cast produced by fluorescent tubes, CFLs, sodium- and mercury-vapour, and metal halide lighting fixtures. Some cameras have a single fluorescent preset while others have several because fluorescent lights (much like LEDs, to which this preset is also applicable) are available in many varieties—from warm-white to cool-white light—and with varying degrees of a green cast—from none to lots. Because of these unpredictable, try using Auto white balance or set up a Custom white balance (See below Custom) when you find that your camera doesn’t have an adequate preset for the fluorescent light you are trying to match.
Tungsten or Incandescent. The tungsten or incandescent white balance preset on most cameras is intended for taking photos of subjects illuminated by true tungsten filament lightbulbs that emit a continuous spectrum of light with colour temperatures between 2750 K (conventional 60 W bulb) and 3200 K (halogen bulbs, like in pot lights). This preset is also appropriate for high-quality warm-white LED lamps that have no or very minimal green colour casts.
K. The K or Kelvin white balance setting allows you to manually select a colour temperature value within a predefined range, which is typically 2500-10,000 K.
Custom. With the custom white balance setting, you precisely set the white balance to match the colour of the illuminant by using a neutral reference target. This works by choosing a neutral subject as a point of reference and taking a photo of it under the source of light to which you match the camera. The camera analyzes the reference photo and determines a white balance that precisely matches the light conditions. The procedure varies significantly across different makes and models: refer to your camera’s instruction manual for specific directions.
White balance: JPEG and raw
Your camera’s white balancing process is entirely digital and manipulates the data after the photograph is captured. Furthermore, recall that raw images contain unprocessed data and that JPEG images are derived from raw data that’s been processed by the camera, and that white balance is a necessary step in that process. Therefore, selecting the right white balance is essential when saving JPEG images because your choice becomes an inherent part of the photograph, and any attempt to correct it afterwards will negatively affect image quality. Conversely, raw images are entirely unaffected by your choice of white balance. You may modify the white balance of a raw image during the editing process without degrading its quality.


Balancing mixed sources of coloured light
There will be occasions where you’ll encounter multiple illuminants with different colour temperatures, tints, or both. There’s no single rule of thumb for correctly handling such situations, although there are several approaches that deserve your consideration. First, if you’re in a hurry or the picture is fleeting, take the photo in raw format. This approach will allow you to postpone a decision until a later time.
Second, designate one of the illuminants as your “key-light” and set your white balance to match it. In photography, the key light is the main illuminant for your subject. For example, if you’re setting up an interior portrait, and your subject is illuminated partly by lamplight (from inside) and partly by daylight (through a window), set your white balance to match the illuminant providing light to the most visually prominent part of their face.
Third, when there is no apparent key-light, set the white balance to match with either the natural light (if available) or the coolest ambient illuminant. In general, mixed-light images are more pleasing when the warm-coloured elements are rendered warmer than we remember than when cool-coloured details are made cooler than we remember.


What is “correct” white balance?
Up to this point, we’ve described the concept of white balance in absolute terms: it’s correctly set when a neutral object, in reality, is rendered neutral in the resulting picture. Despite this, you will encounter situations where a neutral rendition of neutral subjects will produce less pleasing photographs than those exhibiting a colour cast. For example, the colour temperature of the setting sun is similar to that of an incandescent lightbulb and becomes progressively redder as it disappears beyond the horizon. This golden-orange light is highly sought after by photographers, and for a good reason—it’s universally appealing. Setting your camera’s white balance to match the colour temperature of the setting sun creates a visual dissonance between the photograph and your recollection of the scene. Similarly, the colour of light from campfires, fireplaces, and candles is often rendered much warmer than neutral.
Beyond permitting specific sources of light to fall in line with your visual memory of the scene, your choice of white balance can rely entirely on aesthetic considerations. You may choose to render a rainy scene as cooler than neutral to emphasize the weather, or warmer than neutral to diminish it. Ultimately, the choice rests on your aesthetic preferences.

